My departure from FFXI has been pretty sad (yet easy since this is like my 50th time to quit :p ) so I will miss teaching you all stuff! Originally it was never my intention to quit modding, because I enjoy modding more than the game itself! However soon after I quit FFXI I decided I needed to reformat my computer because it was becoming bogged down with porn and whatnot. (Just kidding! ...just kidding :B)
Modding for me was always I guess like my Aegis shield. I always wanted to be the top modder in our little linkshell of modders, but I couldnt ever get to that point without you guys! Without your continuing support and interest in my projects, you gave me the motivation to continue on even if the road looked endless!
So I just want to say thank you to everyone who enjoyed Goobbue Racer (Made it to the header of the BG spam forums! Talk about honor!) and all my other mods! You all have been great and I hope to keep in touch until FFXIV!
I am sticking to my guns though, and will return to dat modding, only if the Samurai Papercraft face is removed from FFXIDats.com front page. :p
Ok so this guide will be short, and not have pictures because... well I dont have any means of making any xD but it will be pretty self explanatory.
Click for full picture
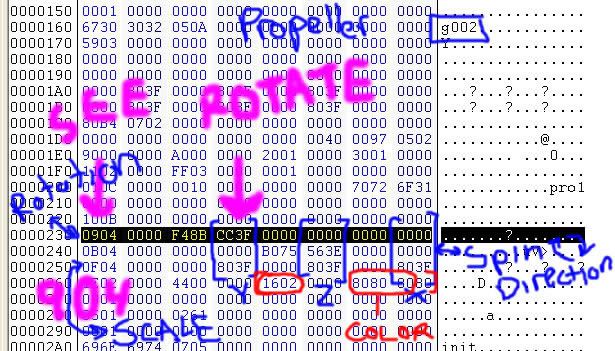
Some of you might remember this picture from earlier, I used to have it as my signature on FFXIDats. This explains how to change everything. At the time the picture was made I was very excited (as always when I figure something new out) so its kinda sloppy but I'll explain it to ya.
So first off it says PROPELLER, ignore this, it just signifies that I was using the little propeller effect from the model airship. (I used it to make a propeller hat for my galka :p )
One thing you should take from that though is that this all takes place in the "sub-schedule" of the effect.
The line where the model data is called (says ......pro1) signifies the "Halfway point" of a sub-schedule. Below this is all the positioning and scale etc.
The line directly below the Halfway point is always the positioning of the effect. So in the picture it says
0000 0000 0000 0000 0000 0000 0000 0000
That means its in the default position. If you would want to move it you would follow the general format of Y Z X in the picture.
0000 0000 0000 0000 0000 0000 0000 0000 Green is Y, Blue is Z, and Red is X
You can take this example and place it onto the rest of the examples listed in the picture.
0904 0000 F48B CC3F 0000 0000 0000 0000
as you can see here the 0904 at the beginning of the line represents that this line controls the rotation of the effect. Since the propeller is constantly spinning on its Y axis, only the Y axis has numbers.
Generally you want to enter in numbers close to or around CC3F to start with even with positioning etc, because that will move it to a pretty far off spot, then you can work it up or down from there by increasing or decreasing from CC3F
(for example if you want to position an effect specifically on the head you would put in CC3F for the Y value, then move it down if its too high to something like CC2F or CC1F, its pretty random sometimes so work at it)
Now sometimes these lines will not start at the beginning of a line. You will need to keep a keen eye out for these values that represent the start of a line.
If you want to find the scale of an effect look in the bottom half of the sub schedule for 0F04, once you find that you know thats where the "Scale line" starts, then you count over and start replacing values where the X Y Z coordinates would need to be.
There are many many values I never had time to find, but you probably shouldnt need anything aside from knowing 0F04 = SCALE and the first line below the half-way point is POSITION.
Im posting it again so you dont have to scroll up :P (or at least I dont have to to write this hah) Anyways the last thing I can teach you is the COLOR part. Some effects are colored, however the textures are black and white, an example would be Stinging Pummel (? the pup thing i think, its yellow and sparkly) if you check out the textures for that, it will be black and white. So wtf is coloring it right?Well that is where 1602 comes in.
1602 0000 8080 8080
I dont know if many of you have read my Avatar glow guide (ancient... ah the good ol days) but this is kind of the same thing for changing color. If you type in 808080 into your favorite graphics editing program it will come up with a grayish color, that represents the color of the propeller.
So for stinging pummel it will be something completely different from 808080, but the point is, you find out the hex value of what color you want it to be, then plug it in where 808080 is in the picture that follows 1602.
Oh one last thing. When Pixel made the flaming staff there was a problem that the effect would pop, however it would not attach to his staff. This is true for some effects like the weird seed things baby aldo had in Qufim Island.
If you check them out in AV while your character is running, it will activate the effect wherever you weight it, however it will not follow what you attached it to.
The way to cure this is open up the sub schedule of an effect that DOES follow the weapon and copy the line RIGHT ABOVE the half-way point, then paste this over the line right above the half-way point of the effect that does not follow.
Once that is done it should follow fine.
Lots of stuff is still unknown, and I hope you guys continue to try to figure stuff out! I'll still be around, so feel free to ask me questions in PM or something (Although my brain is fading so I might not know as much as I did!)
Thanks guys! Seeya!
0 comments:
Post a Comment